
이 글을 읽기 전에 먼저 읽으면 좋은 글!
특정 각도에서 일정 거리의 좌표 구하기
내 캐릭터 기준 30도, 50m에 있는 적을 감지하고 싶을 때는 어떻게 구현할 수 있을까? 바로 삼각함수중 코사인 함수와 사인 함수를 이용하면 쉽게 구할 수 있다. 코사인(cos) 코사인은 삼각형에서
hi-develop.tistory.com
각도의 단위, 라디안(radian)과 디그리(degree)
라디안(radian)과 디그리(degree)는 각도를 측정하는 단위이다. 디그리(degree)는 원을 360도로 나누어 정의한 각도의 단위이며 수학에서는 호도법을 사용하여 2π 라디안이 360도에 해당하는 것으로 정
hi-develop.tistory.com
선형 보간법(linear interpolation)
UI 버튼을 화면에 표기하려 한다. 이 때 UI는 처음 화면 밖에 있다가 화면 중앙으로 빠르게 이동하면서 천천히 중앙에 도달하는 애니메이션 UI를 만들고 싶을 때 어떻게 하면 좋을까? function lerp(pos
hi-develop.tistory.com
완성된 작업물은 여기!
GitHub - SIMHANSOL/React-Canvas-Hex: Draw hexagon using canvas.
Draw hexagon using canvas. Contribute to SIMHANSOL/React-Canvas-Hex development by creating an account on GitHub.
github.com
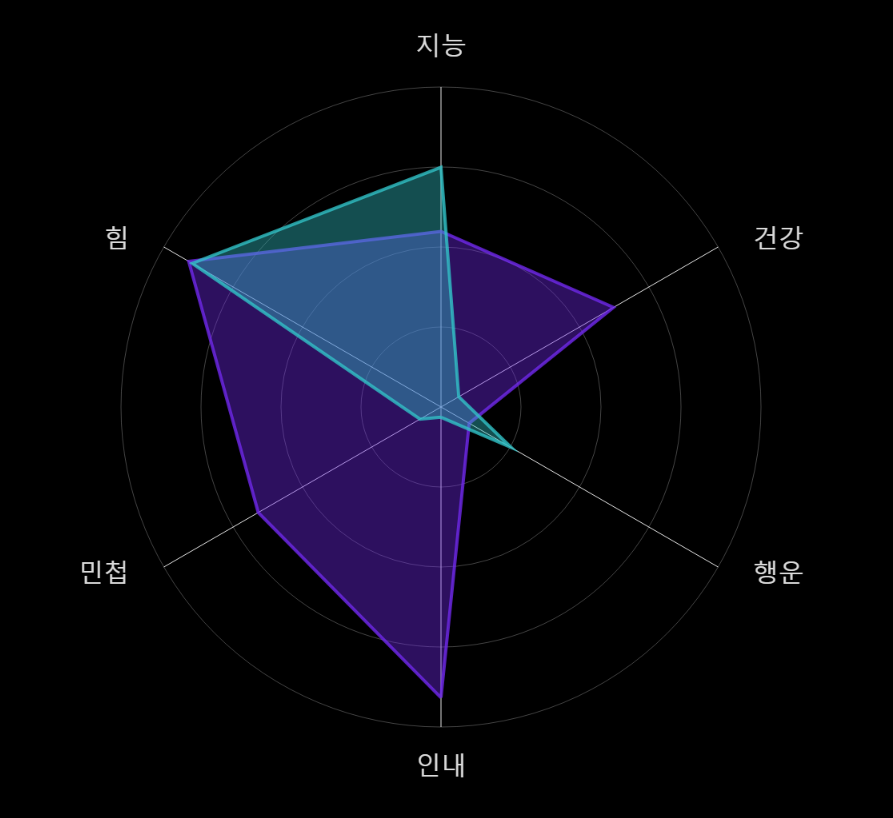
자회사의 게임 관련 티저 페이지를 개발하는 중 디자이너분께서 일러스트 캐릭터 옆에 움직이는 육각형 그래프를 만들어달라고 하셨다.

사실 이 프로젝트가 그렇게 여유가 많지는 않았는데 이제 막 자사의 모노레포 세팅, 스타일 세팅에 접어들었던 시점이였기 때문이다. 그렇기에 애니메이션 구현을 해야할지 말아야할지 상당히 고민되는 작업이였다. 특히 육각형은 게임에서나 사용해봤지, 웹상에서 구현한 적은 없었기 때문에 일정 계산이 애매했다.

일단 제일 먼저 두개의 육각형 그래프를 가지고 움직이는 애니메이션을 구현해야 하기 때문에 길이가 6인 빈 2차원 배열을 선언했다.
const graphScore = [
  [0, 0, 0, 0, 0, 0],
  [0, 0, 0, 0, 0, 0],
];

const score = useRef([...graphScore]);
const tempScore = useRef([...graphScore]);score, tempScore 값을 통해 그래프를 움직이려 한다. score은 실제 그래프의 현재 값이고 tempScore는 목표 값이다. score 변수는 tempScore가 설정된 값에 도달할 때까지 천천히 증감시키고자 한다. 그렇게 하면 그래프가 움직이는 애니메이션을 구현할 수 있다.
컴포넌트 밖에다가 선언해도 되고 안에다가 선언해도 되는데 밖에다가 선언하면 전역 변수가 되버리기 때문에 재활용을 할 수가 없다. 따라서 재활용성을 고려하여 안에다가 useRef로 선언했다. useRef로 선언하면 리렌더링을 통한 변수 재할당이 이뤄지지 않는다.
const hexagonAnimation = useCallback(() => {
  const scoreCurrent = score.current;
  const tempCurrent = tempScore.current;

  for (let i = 0; i < scoreCurrent.length; i += 1) {
    for (let j = 0; j < scoreCurrent[i].length; j += 1) {
      let scoreVal = scoreCurrent[i][j];
      const tempVal = tempCurrent[i][j];

      if (Math.abs(scoreVal - tempVal) >= 0.0001) {
        scoreVal += (tempVal - scoreVal) * 0.05;
      } else {
        tempCurrent[i] = [Math.random(), Math.random(), Math.random(), Math.random(), Math.random(), Math.random()];
      }
      scoreCurrent[i][j] = scoreVal;
    }
  }
}, []);
이제 그래프 값을 수정하는 함수를 구현하였다.
2중 반복문으로 score와 tempScore의 각 원소를 비교하여 값 차이가 0.0001 이하일 경우 tempScore의 원소들을 랜덤 값으로 지정하고 그게 아닌 경우 score의 원소에 선형 보간법을 이용하여 tempScore의 값에 접근할 수 있도록 천천히 값을 증가시킨다.
참고로 Math.random은 0에서 1의 랜덤한 값을 반환한다.
즉, score나 tempScore나 0에서 1의 랜덤한 값 안에서 이루어진다. 이 특성은 나중에 계산 식으로 활용할 예정이다.
그래프 값은 이제 천천히 증가할 것이며 선형 보간법을 이용했기 때문에 하나의 원소라도 0.0001에 도달할 경우 모든 원소가 어느정도 도달했음(도달했을 때 반복문을 한박자 쉬지 않는 이상 0.05%의 오차 있음)을 정의할 수 있고 이에 따라 새로운 그래프 값으로 할당하여 그래프 움직임을 반복한다.

const graphRef = useRef<HTMLCanvasElement>(null);

return (
  <>
    <section style={{ backgroundColor: "black", overflow: "hidden" }}>
      <canvas ref={graphRef} width={"100%"} height={"100%"} />
    </section>
  </>
);가장 먼저 canvas 태그를 사용하여 ref에 등록하였다.
const playCanvas = () => {
  const canvasElement = graphRef.current;
  const context = canvasElement?.getContext("2d");

  if (canvasElement == null || context == null) return;

  ...
}그리고 함수를 하나 생성하여 canvas의 element와 context를 가지고 작업을 진행하고자 한다. ref 특성상 null 값이 들어올 수 있다는 경고(또는 DOM 생성 이전에 접근할 경우 null)가 나오기 때문에 null checking을 통해 방지했다.
useLayoutEffect(() => {
  playCanvas();
}, []);useLayoutEffect를 사용하여 이 함수를 실행하도록 하였는데 canvas 기능을 이용하기 위해서는 최소한 렌더링이 완료된 시점이여야 하고 canvas가 보여야 함으로 동기적으로 실행하는 useLayoutEffect를 사용하였다. 실제로 useEffect를 사용하고 새로고침을 하면 깜빡임 증상이 보인다. 페이지 로드 성능 상에 이슈가 있을 경우 비동기로 실행하는 useEffect를 사용하는 게 나을 것 같지만 페이지 자체가 고객에게 잘 보여야 하는 게 주된 목표임으로 useLayoutEffect를 사용하기로 했다.

const playCanvas = () => {
  const canvasElement = graphRef.current;
  const context = canvasElement?.getContext("2d");

  if (canvasElement == null || context == null) return;

  // 초기화 변수
  const hexagonRadius = 400;
  const hexagonSide = 6;
  const hexagonAngle = (360 / hexagonSide) * (Math.PI / 180);

  // 캔버스 그리기
  const drawCanvas = () => {
    canvasElement.width = 1920;
    canvasElement.height = 1080;
    const hexagonPosX = canvasElement.width / 2;
    const hexagonPosY = canvasElement.height / 2;

    ...

    requestAnimationFrame(drawCanvas);
  }

  drawCanvas();
}playCanvas 함수 안에 drawCanvas를 생성한다. 육각형의 수치들은 지속적으로 업데이트를 해주어야 하기 때문에 requestAnimationFrame 함수를 통해 drawCanvas를 넘겨주어 지속적으로 실행할 수 있게끔 만들었다.
canvas의 너비와 높이를 설정(문서 용지 설정과 비슷)해주고 canvas 가운데에 그래프를 그릴 예정임으로 x, y 위치를 가운데로 설정해주었다.
그리고 육각형을 그리기 위해 필요한 변수들을 미리 설정하였다.
hexagonRadius는 육각형의 반지름 길이를,
hexagonSide는 말 그대로 꼭지점이 6개 있음을,
hexagonAngle은 360도를 꼭지점을 기준으로 등분하여 나온 각의 크기를 라디안으로 반환한 값이다.
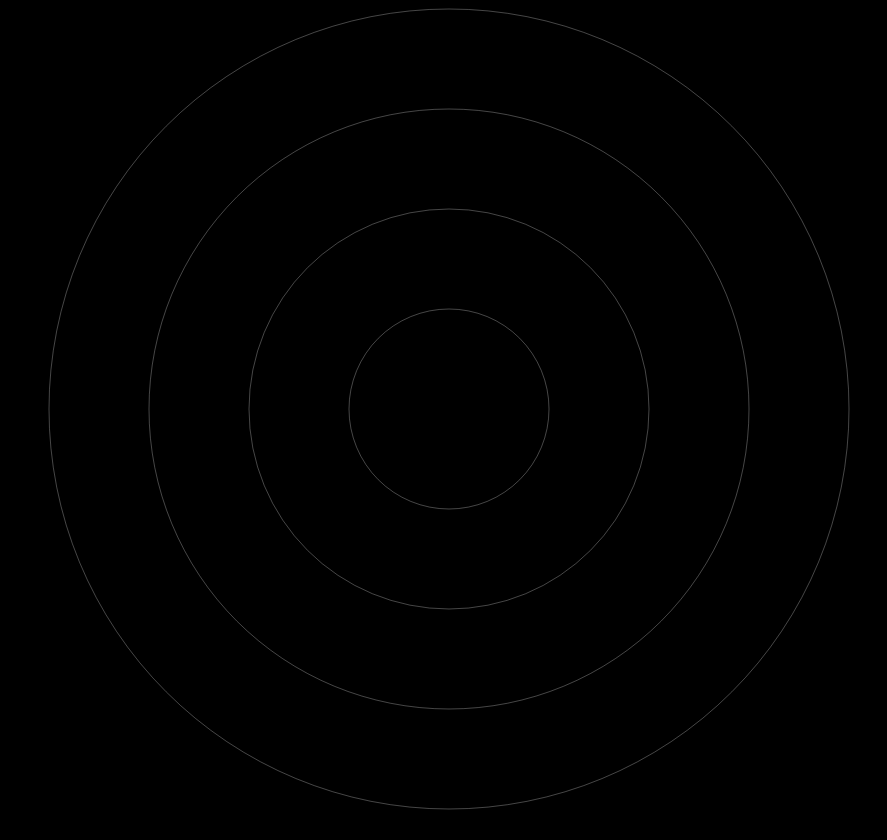
// 윤곽 그리기
for (let i = 1; i <= 4; i += 1) {
  context.beginPath();
  context.arc(hexagonPosX, hexagonPosY, (hexagonRadius / 4) * i, 0, 2 * Math.PI);
  context.strokeStyle = `#eaeaea4c`;
  context.lineWidth = 1;
  context.stroke();
  context.closePath();
}이 코드는 전에 canvas에서 가져왔던 context를 통해 표적판 윤곽을 그리고 있으며, context의 beginPath로 새로운 경로를 생성하고 arc를 통해 원으로 경로를 지정하고 있다.
strokesyle로 선의 색상을 지정하였으며, linewidth로 굵기를 지정했다.
지정된 경로에 stroke를 이용하여 경로를 따라 선을 그려내고 사용이 끝난 경로는 closePath로 비워냈다.
4개의 윤곽을 그리기 위해 반복문을 사용했는데 (hexagonRadius / 4) * i 수식을 통해 반복문마다 100, 200, 300, 400의 반지름을 가진 윤곽을 그리게 된다.
(method) CanvasPath.arc(x: number, y: number, radius: number, startAngle: number, endAngle: number, counterclockwise?: boolean): voidCanvasPath.arc()
canvas에서 원을 그리기 위해 자주 사용되는 함수다.
[시작점 x, 시작점 y, 반지름, 시작 각도, 종료 각도, 각도 방향]을 매개 변수로 받고 있다.
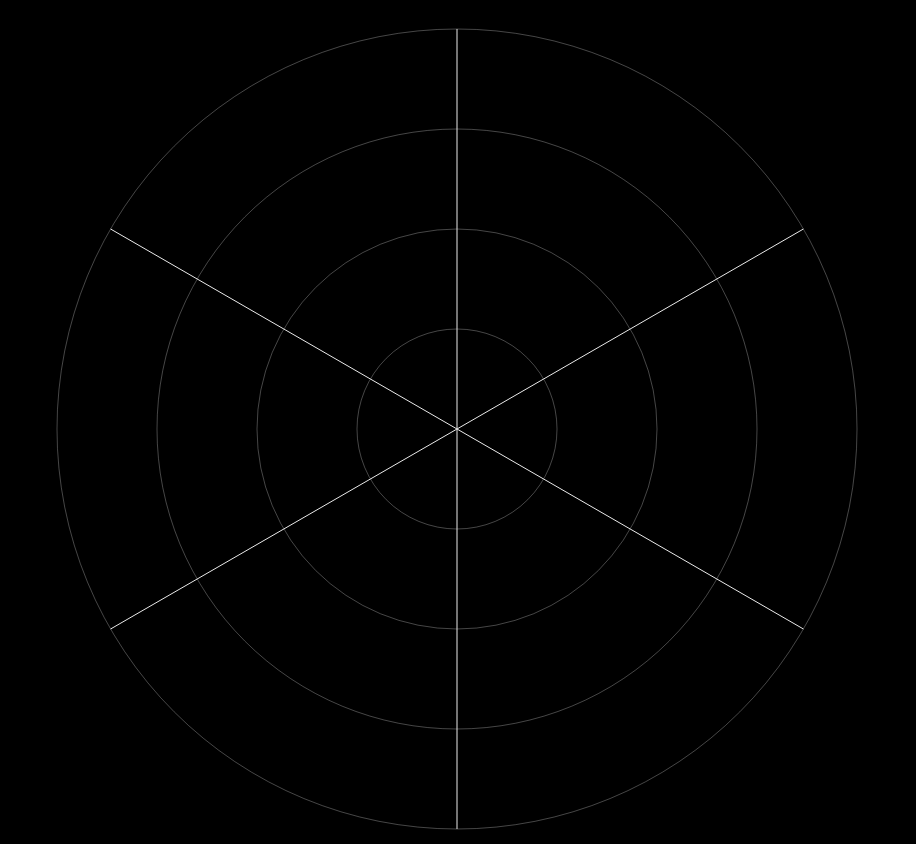
// 선 그리기
for (let i = 0; i < hexagonSide; i += 1) {
  context.beginPath();
  context.moveTo(hexagonPosX, hexagonPosY);

  context.lineTo(
    hexagonPosX + hexagonRadius * Math.sin(hexagonAngle * i),
    hexagonPosY + hexagonRadius * Math.cos(hexagonAngle * i)
  );
  context.strokeStyle = `#eaeaea`;
  context.lineWidth = 1;
  context.stroke();
  context.closePath();
}이 코드는 중심점으로부터 꼭지점 6개를 따라 선을 그리는 작업을 수행한다.
이전처럼 경로를 생성하였고 그 경로의 시작점을 육각형의 가운데로 옮겼다.
그리고 가운데를 기점으로 각의 크기에 따라 반지름의 길이를 추가해 예쁜 선을 만들었다.
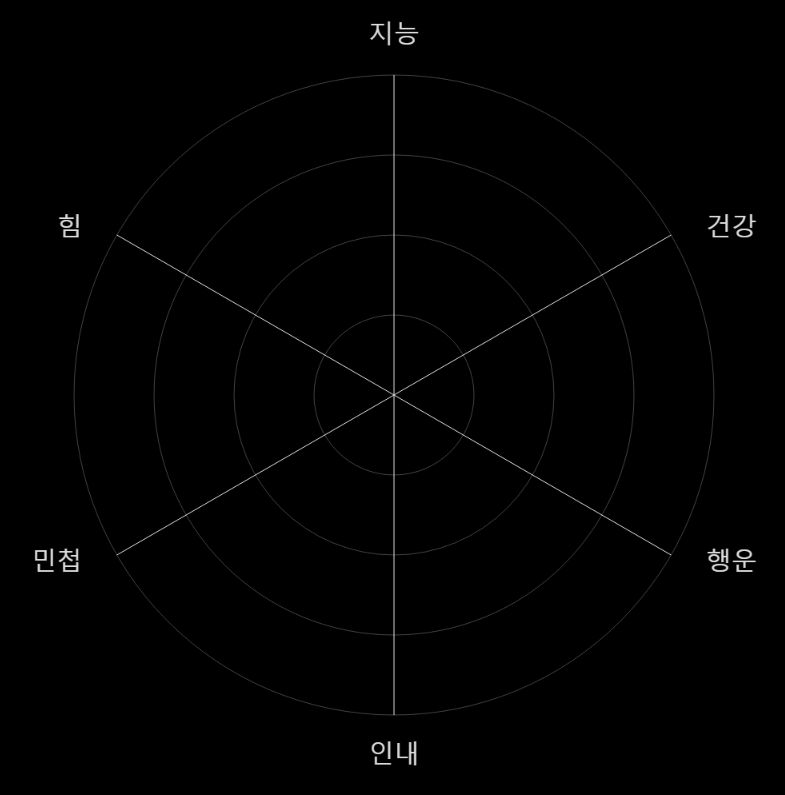
const texts: Array<{
  text: string;
  align: CanvasTextAlign;
  line: CanvasTextBaseline;
}> = [
  {
    text: "인내",
    align: "center",
    line: "middle",
  },
  {
    text: "행운",
    align: "start",
    line: "bottom",
  },
  {
    text: "건강",
    align: "start",
    line: "top",
  },
  {
    text: "지능",
    align: "center",
    line: "middle",
  },
  {
    text: "힘",
    align: "end",
    line: "top",
  },
  {
    text: "민첩",
    align: "end",
    line: "bottom",
  },
];일단 사용할 글자들을 선언하여 초기화 변수 밑에 넣어둬야 한다.
// 선 그리기
for (let i = 0; i < hexagonSide; i += 1) {

  ...

  if (matchMedia("(min-width: 40em)").matches) {
    context.font = "2rem roboto";
  } else if (matchMedia("(min-width: 90em)").matches) {
    context.font = "1.875rem roboto";
  } else {
    context.font = "2.25rem roboto";
  }

  context.fillStyle = `#dbdbdb`;
  context.textAlign = texts[i].align;
  context.textBaseline = texts[i].line;
  context.fillText(
    texts[i].text,
    hexagonPosX + (hexagonRadius + 50) * Math.sin(hexagonAngle * i),
    hexagonPosY + (hexagonRadius + 50) * Math.cos(hexagonAngle * i)
  );
}그리고 선 그리기 작업 안에 텍스트를 추가적으로 넣었다. fillstyle로 폰트 색상을 결정할 수 있고 textAlign, Baseline으로 위치 설정까지 가능하다. 그리고 fillText를 이용하여 canvas 내부에 글자를 추가하고 있는 모습을 볼 수 있다.
위에 조건문 matchMedia는 반응형 대비 넣어뒀었는데 저런 식으로 사용하면 된다.
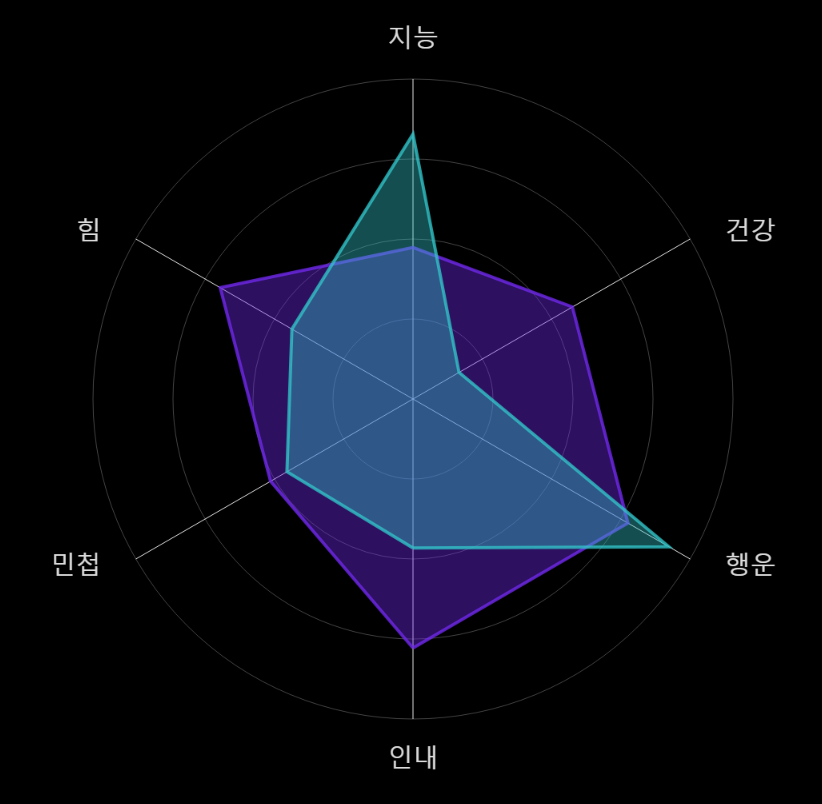
// 그리기 전 좌표 계산
for (let k = 0; k < score.current.length; k += 1) {
  const hexagonPoints = Array.from({
    length: hexagonSide,
  }).map((_, i) => ({
    x: hexagonPosX + hexagonRadius * score.current[k][i] * Math.sin(hexagonAngle * i),
    y: hexagonPosY + hexagonRadius * score.current[k][i] * Math.cos(hexagonAngle * i),
  }));

  // 그래프 수치화
  context.beginPath();
  context.moveTo(hexagonPoints[0].x, hexagonPoints[0].y);
  for (const hexagonPoint of hexagonPoints.slice(1)) {
    context.lineTo(hexagonPoint.x, hexagonPoint.y);
  }
  context.lineTo(hexagonPoints[0].x, hexagonPoints[0].y);
  context.fillStyle = k === 0 ? `#722aee66` : `#33c4c966`;
  context.fill();
  context.strokeStyle = k === 0 ? `#722aeecb` : `#33c4c9cb`;
  context.lineWidth = 4;
  context.stroke();
  context.closePath();
}수치를 표현화하기 전에 모든 꼭지점의 좌표 계산을 먼저 끝내놓은 다음에,
그릴 땐 편하게 계산된 꼭지점 경로를 이어가며 그리고 있다.
score에는 0에서 1의 값만 들어있는데, 값이 0.5라면 hexagonRadius * 0.5가 되기 때문에 반지름의 절반이다.
즉, 0.5의 값은 반지름의 절반을 의미하며 반지름이 400이라면 200을 나타낸다.
이 200의 값을 삼각함수를 통해 각도에 맞게 위치 조절을 해주었다.
그리고 바로 작동하지 않을텐데 수치가 전부 0으로 초기화되어 있기 때문에 그렇다.
따라서 만들어두었던 hexagonAnimation 함수를 작동시켜야 함으로 drawCanvas 함수 안에 넣어 실행해주면 된다. requestAnimationFrame으로 인해 주기적으로 실행되기 때문에 의도된 대로 작동한다.
const playCanvas = () => {

  ...

  // 캔버스 그리기
  const drawCanvas = () => {
    canvasElement.width = 1920;
    canvasElement.height = 1080;
    const hexagonPosX = canvasElement.width / 2;
    const hexagonPosY = canvasElement.height / 2;

    hexagonAnimation();

    ...

  }

  ...

}이렇게 그래프 애니메이션을 구현할 수 있었다!

완성된 로직은 다음과 같으며 컴포넌트로 구성되어 있으니 React를 사용중이라면 바로 복사하여 테스트해볼 수 있다.
import React, { useLayoutEffect } from "react";
import { useCallback, useRef } from "react";

const GraphAnimation = () => {
  const graphScore = [
    [0, 0, 0, 0, 0, 0],
    [0, 0, 0, 0, 0, 0],
  ];

  const score = useRef([...graphScore]);
  const tempScore = useRef([...graphScore]);

  const graphRef = useRef<HTMLCanvasElement>(null);

  const hexagonAnimation = useCallback(() => {
    const scoreCurrent = score.current;
    const tempCurrent = tempScore.current;

    for (let i = 0; i < scoreCurrent.length; i += 1) {
      for (let j = 0; j < scoreCurrent[i].length; j += 1) {
        let scoreVal = scoreCurrent[i][j];
        const tempVal = tempCurrent[i][j];

        if (Math.abs(scoreVal - tempVal) >= 0.0001) {
          scoreVal += (tempVal - scoreVal) * 0.05;
        } else {
          tempCurrent[i] = [Math.random(), Math.random(), Math.random(), Math.random(), Math.random(), Math.random()];
        }
        scoreCurrent[i][j] = scoreVal;
      }
    }
  }, []);

  const playCanvas = () => {
    const canvasElement = graphRef.current;
    const context = canvasElement?.getContext("2d");

    if (canvasElement == null || context == null) return;

    // 초기화 변수
    const hexagonRadius = 400;
    const hexagonSide = 6;
    const hexagonAngle = (360 / hexagonSide) * (Math.PI / 180);
    const texts: Array<{
      text: string;
      align: CanvasTextAlign;
      line: CanvasTextBaseline;
    }> = [
      {
        text: "인내",
        align: "center",
        line: "middle",
      },
      {
        text: "행운",
        align: "start",
        line: "bottom",
      },
      {
        text: "건강",
        align: "start",
        line: "top",
      },
      {
        text: "지능",
        align: "center",
        line: "middle",
      },
      {
        text: "힘",
        align: "end",
        line: "top",
      },
      {
        text: "민첩",
        align: "end",
        line: "bottom",
      },
    ];

    // 캔버스 그리기
    const drawCanvas = () => {
      canvasElement.width = 1920;
      canvasElement.height = 1080;
      const hexagonPosX = canvasElement.width / 2;
      const hexagonPosY = canvasElement.height / 2;

      hexagonAnimation();

      // 선 그리기
      for (let i = 0; i < hexagonSide; i += 1) {
        context.beginPath();
        context.moveTo(hexagonPosX, hexagonPosY);

        context.lineTo(
          hexagonPosX + hexagonRadius * Math.sin(hexagonAngle * i),
          hexagonPosY + hexagonRadius * Math.cos(hexagonAngle * i)
        );
        context.strokeStyle = `#eaeaea`;
        context.lineWidth = 1;
        context.stroke();
        context.closePath();

        if (matchMedia("(min-width: 40em)").matches) {
          context.font = "2rem roboto";
        } else if (matchMedia("(min-width: 90em)").matches) {
          context.font = "1.875rem roboto";
        } else {
          context.font = "2.25rem roboto";
        }

        context.fillStyle = `#dbdbdb`;
        context.textAlign = texts[i].align;
        context.textBaseline = texts[i].line;
        context.fillText(
          texts[i].text,
          hexagonPosX + (hexagonRadius + 50) * Math.sin(hexagonAngle * i),
          hexagonPosY + (hexagonRadius + 50) * Math.cos(hexagonAngle * i)
        );
      }

      // 윤곽 그리기
      for (let i = 1; i <= 4; i += 1) {
        context.beginPath();
        context.arc(hexagonPosX, hexagonPosY, (hexagonRadius / 4) * i, 0, 2 * Math.PI);
        context.strokeStyle = `#eaeaea4c`;
        context.lineWidth = 1;
        context.stroke();
        context.closePath();
      }

      // 그리기 전 좌표 계산
      for (let k = 0; k < score.current.length; k += 1) {
        const hexagonPoints = Array.from({
          length: hexagonSide,
        }).map((_, i) => ({
          x: hexagonPosX + hexagonRadius * score.current[k][i] * Math.sin(hexagonAngle * i),
          y: hexagonPosY + hexagonRadius * score.current[k][i] * Math.cos(hexagonAngle * i),
        }));

        // 그래프 수치화
        context.beginPath();
        context.moveTo(hexagonPoints[0].x, hexagonPoints[0].y);
        for (const hexagonPoint of hexagonPoints.slice(1)) {
          context.lineTo(hexagonPoint.x, hexagonPoint.y);
        }
        context.lineTo(hexagonPoints[0].x, hexagonPoints[0].y);
        context.fillStyle = k === 0 ? `#722aee66` : `#33c4c966`;
        context.fill();
        context.strokeStyle = k === 0 ? `#722aeecb` : `#33c4c9cb`;
        context.lineWidth = 4;
        context.stroke();
        context.closePath();
      }

      requestAnimationFrame(drawCanvas);
    };
    drawCanvas();
  };

  useLayoutEffect(() => {
    playCanvas();
  }, []);

  return (
    <>
      <section style={{ backgroundColor: "black", overflow: "hidden" }}>
        <canvas width={"100%"} height={"100%"} ref={graphRef} />
      </section>
    </>
  );
};

export default GraphAnimation;
'개발 이야기 > React' 카테고리의 다른 글
| React, Key 속성을 왜 사용하는지 알고 사용하자 (0) | 2023.07.19 |
|---|---|
| React(리액트)는 Storybook(스토리북)을 적극 사용하자. (0) | 2023.07.05 |
| 한글 타이핑 시스템을 구현해보았다. (0) | 2023.06.02 |